We use affiliate links. If you purchase something using one of these links, we may receive compensation or commission.

Have you also, during confinement, tested all kinds of recipes that you didn’t dare to make before? Before, I didn’t dare take up baking… But since I succeeded in making bread and brioches, I dare more and more to venture into the mysterious world of yeast dough! And I love it!
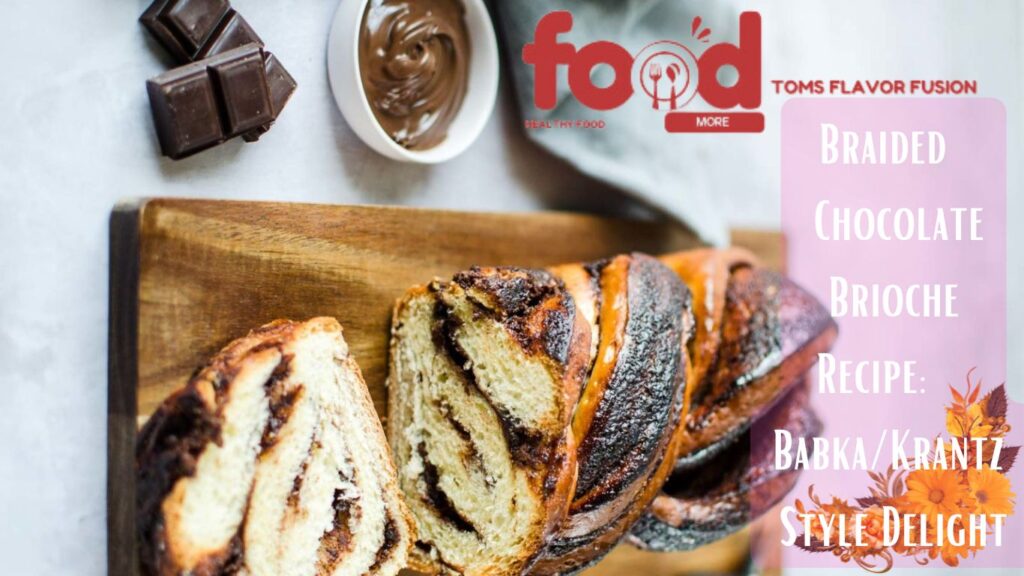
This braided chocolate brioche is just a marvel! A treat for both the eyes and the taste buds! I’ve been dreaming of doing one like this for years and, seeing them invade the American blogosphere, I gave in to the temptation on my side too. It is a marbled brioche with thin layers of chocolate, soft, shiny, delicious.
Let’s go back in time
For the record, Babka or Krantz is a brioche originating from Eastern Europe and very popular around the world, especially in the United States (especially in New York!). Cousin of panettone Italian and kugelhopf Austrian, it is often associated with Jewish Easter celebrations.
It can take a braided shape cooked in a cake mold or can also be made into a crown. Traditionally garnished with candied fruit, cinnamon or almonds, it has evolved over time and with the migrations of the Ashkenazi Jewish community. It was enriched with butter and was later available with many fillings, such as chocolate or praline, or even both at the same time!
On to the recipe
It’s not particularly reasonable, with its dose of chocolate spread, I understand that, but I think that a slice of brioche like that is worth miles of running in endorphins, right?! (That’s my scientific side (or not) speaking, hehe).
For this treat, I was inspired by Charlotte’s recipes from the blog Paris with Charlotte and Lysis of the blog Yummixtwo blogs that I really like.
Don’t hesitate to get started in any case. The technique is very simple, but as with other pastry recipes, it is necessary to have good organization and time in front of you. Allow time to follow all the steps (i.e. preparing the dough the day before, resting overnight in the fridge, 25 minutes of shaping the next day and another 1.5 hours of rest before 35 minutes of cooking).
If you are equipped with a mixer, it will go even faster for you because it is the machine that will do (almost) all the work. And honestly, it’s worth it!
The ultimate indulgence for me? It would be to garnish this braided brioche with a chocolate-praline mixture or dark chocolate and pieces of caramelized hazelnuts… Well well… I’ll leave you, with that, in the company of said recipe!
Ingredients
Bun
- 20 g of fresh baker’s yeast (for dehydrated yeast, see notes)
- 120 gd’ lukewarm water
- 530 g of flour (I use organic T55, T45 is also suitable)
- 90 g of sugar
- 3 eggs (fat)
- 150 g of soft butter
- 1 c. coffee of fine salt
Trim
- 1 pot of hazelnut-chocolate spread (approx. 350 g) (I used organic Nocciolata spread)
Steps
The day before: Prepare the brioche dough
Cut the butter into small pieces and let sit at room temperature on a plate.
Crumble the fresh yeast into a bowl, add the lukewarm water and leave to sit for 2 minutes.
In the bowl of a mixer, pour the water + yeast mixture. Add the flour, sugar, salt. Knead for 10 minutes. After 2 minutes, add the eggs one by one.
Then add the butter gradually and continue kneading for a good 15 minutes. At the end of kneading, the dough should come away from the sides of your robot and should not stick to your fingers. If so, add one tbsp. of flour and continue kneading for another 5 to 10 minutes.
Place the dough in a floured bowl, leave to rest for 1 hour covered with a clean cloth in a warm place in your home (or an oven preheated to 50°C then turned off, if there is no warm place). Then wrap and place in the fridge overnight.
D-Day: Shaping and Cooking
- Line two cake tins with baking paper. Then take the dough out of the fridge, take half of it and put the other half back in the fridge.
On a floured work surface, roll out the dough into a rectangle approximately 30 x 40 cm wide.
Wet a 2 cm strip at the top of the rectangle using a brush or your fingers. Pour half of the chocolate spread over the dough then spread the filling in a thin layer over the entire surface, except on the top wet strip.
Gently roll the dough from bottom to top, adhering the moistened portion at the end.
Place the resulting roll in the freezer to stiffen it and make the next step easier (10 minutes is enough). Meanwhile, repeat steps 2 to 4 with the other portion of brioche dough (spreading, filling, rolling, freezing).
Once you have finished shaping your second roll, remove the first from the freezer. Cut each end for a cleaner finish then using a sharp knife, cut the roll lengthwise.
You thus obtain two half-cylinders of dough. Arrange them cut (and therefore chocolate) side up. Place one end on the other then press to make them adhere.
Then twist, making sure to keep the cut and chocolate sides facing up.
Place the braid obtained in a cake mold. Repeat steps 6 to 8 (cut, twist, place in pan) for the second roll of brioche dough.
Cover your brioches with a damp cloth and leave to rise in a warm place (in your house or preheated and turned off oven) until they have risen well in the mold. This will take between 1.5 and 2 hours depending on the temperature.
Cooking
Preheat your oven to 180°C. Once well risen, bake your brioches for 35 to 40 minutes.
Meanwhile, make the finishing syrup by bringing the sugar and water to the boil in a saucepan. Then turn off the fire.
Straight out of the oven, brush your brioches well with the syrup (even if it seems like a lot to you).
Then let cool before eating! (even if I know it is very difficult to apply this instruction 😉)
Notes
If you use dehydrated yeast, use the amount recommended by the manufacturer. In theory, it is 1 sachet of 4 g for 250 g of flour so you will need 2 sachets for 500 g of flour. But read the instructions in your package carefully.
